Set up the local development environment
This is the part of the tutorial with the greatest potential for stumbling-blocks, because it involves the installation of software. However the components are very reliable and the vast majority of users encounter no problems at all.
If you do run into any difficulties, please don't hesitate to contact Divio support. We will be glad to help you out.
Most Divio applications include a docker-compose.yml file. It is only used for local development. Divio Cloud only interacts with the Dockerfile and the instructions defined within.
Why is the local development environment so important?
Docker makes it possible to run and work on an application locally in the same environment as it runs on in the cloud. This side-steps some of the most troublesome problems faced by development teams, in which something works well in development, but then runs into trouble as a result of different environment conditions in production, or when another team member tries to set it up on their own machine.
Using Docker means that not only does every member of the development team work in the same environment - which includes versions of installed packages, environment variables, database and other services - but they're all in the same environment that the application will have in production.
The local development environment includes the tools and software that allow you to work on your application, testing it as you go on your own computer. This uses Docker, just like our cloud deployment architecture. The local environment is also integrated with the cloud infrastructure - it's like having a hotline to the cloud.
In this section we will:
Before you start
You will need to have the following installed or configured, and know at least the basics of using them, before proceeding:
- Git (see GitHub's set up Git guide)
- SSH, so that you can provide your public key to a server (GitHub's guides to setting up SSH)
- PIP, the Python Package Installer or a Python Docker container to install the Divio CLI package
Install Docker and Docker Compose
- Mac users: Docker for Mac
- Windows users: Docker for Windows
- Linux users: Docker for Linux
(Windows users should consult the checklist below).
Launch Docker. You can check that it's running correctly with:
docker run --rm busybox true
Additional checklist for Docker installation on Windows
- In Docker's settings, make sure that it is set to use Linux containers.
- Ensure that your Windows user is in the
docker-usersgroup. - When you launch Docker, make sure that you do so as a Windows administrator.
You're now ready to set up the application you created in the previously step in your local environment for development work.
Install the Divio CLI package
The Divio CLI application is installable using PIP. Note that it requires Python 3.8 or higher.
Depending on your system, you may need to use pip3 in the examples below.
pip install divio-cli
If you already have it installed, check that they are up-to-date:
pip install --upgrade divio-cli
You can do this in a virtual environment if you prefer not to install it globally. Otherwise, it's a lightweight component and can easily be removed later if you decide you don't require it.
Alternatively, run the divio CLI directly from a Python Docker container:
docker run --rm -it python:3.8 /bin/bash -c "pip install divio-cli && divio login"
Log in
Make sure you are logged in to your account on the Divio Control Panel. If you don't already have one, now is the time to create it (a Divio account is free to set up and use indefinitely).
The Divio CLI needs to be authenticated with the Control Panel in order to interact with it, using the command:
divio login
This will open your browser at https://control.divio.com/account/desktop-app/access-token/, where you can copy an access token to paste into the prompt. The access token is hidden for security reasons.
If your divio login fails with an invalid token, it could be that the pasting is not working properly and you can either right click once and press enter or enable the Ctrl+Shift+C/V as Copy/Paste (Check the box in the "Command Prompt"/ "Windows Powershell" Properties window) and use Ctrl+Shift+V to paste your access token.
Add your public SSH key to the Control Panel
The Control Panel needs your public key, so that you can interact with our Git server and so on. Visit SSH Keys in the Control Panel. Add your public key. If you're not sure how to manage SSH keys, see the excellent GitHub articles on how to connect with SSH.
Test that your key is set up correctly; you should receive a No interactive access response:
ssh -T git@git.divio.com
Set up an application locally
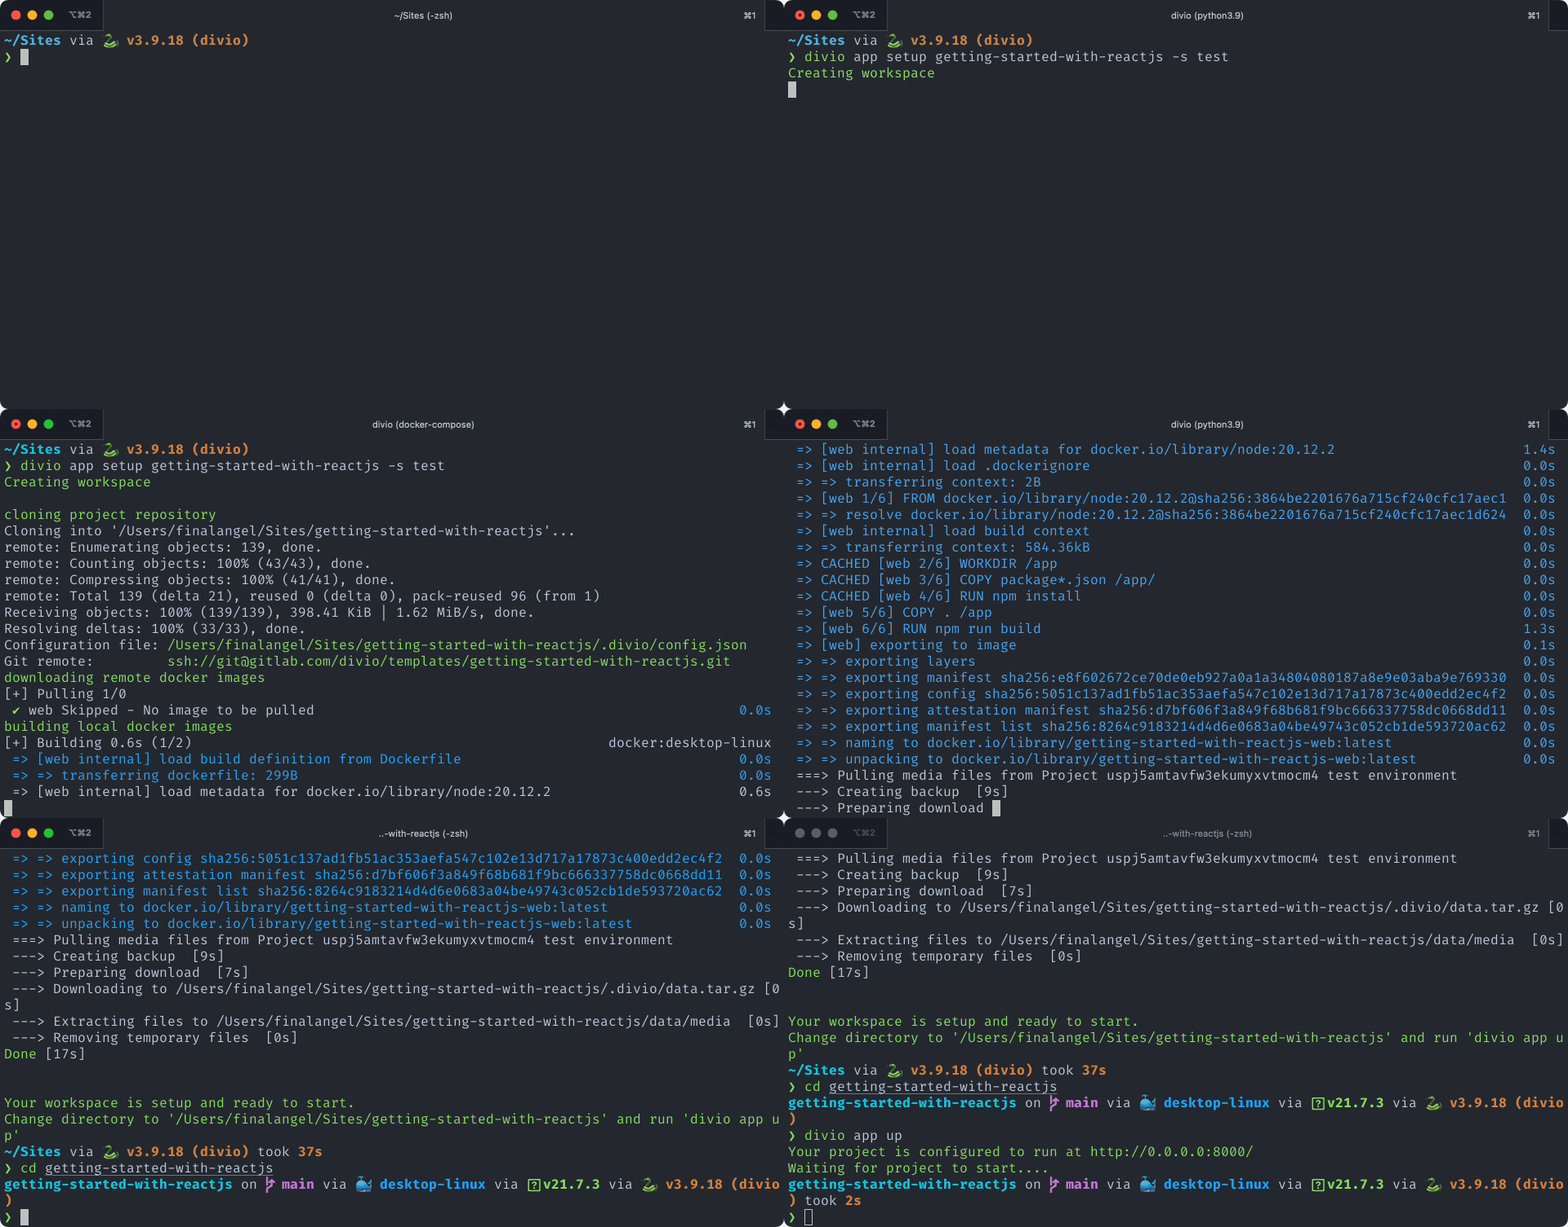
Now you're ready to set up the application you created in the previous step in your local environment for development. To do so run the following command in your terminal:
divio app setup {APP_SLUG} -s test
You can find the command under the Environments view within your application. Have a look at the environments (test or live) card under Commands > Setup.
Follow up by running the application locally:
divio app up
Here is an example of the full process using the Getting started with React template:
