Divio ❤️ nginx
Getting started with Blank
Docker provides a suite of development tools, services, trusted content, and automations, used individually or together, to accelerate the delivery of secure applications. You can read more about Docker from the official website.
This quickstart guide is designed to be straightforward and easy to follow. It will guide you through the process of setting up a Blank application on the Divio Cloud Platform. We'll provide the necessary tools, walk you through the application setup, and explain how to deploy it. While we won't delve into in-depth Blank development concepts, our focus is to get your Blank app up and running on our platform.
To work with Blank and deploy it to the Divio Cloud Platform, you need the following tools:
Download Git
Download Docker
Install Divio CLI
Setting up a Blank app
Setting up a Blank app on the Divio Cloud Platform is a breeze. Regardless of the language, any web application can run on our platform, provided it can be Dockerised. We've made it even easier with our ready-to-go quickstart templates for most languages & frameworks. If you prefer, you can also migrate an existing application or start from scratch and integrate the Divio Cloud Platform later.
Start by creating a free account on the Divio Cloud Platform and choose from any of the following options depending on your requirements:
- Using our Blank template
- Migrate an existing Blank app
- Creating a Blank app from scratch
We will guide you through setting up a new application using our ready-to-go Blank template. The template pre-configures the necessary services and settings so you can get started quickly on the Divio Cloud Platform without fuss.
Head over to the Divio Control Panel and choose to create a new application from the left toolbar. Next, select I want to start from scratch and click on the Blank box from the list of available templates. Hit Next to continue.
Choose where to store your code: Divio's Git server (default) or an external Git provider. Migrating to an external Git server later is also possible. Refer to our guide on importing a repository from Git for details.
- Divio: we provide a Git server to you through
git@git.divio.com:myapp.git. - External: use your own Git server or a third-party provider like Github, Gitlab, or Bitbucket.
The default branch that we and most Git providers use is main. You may change the branch name if you have a different setup.
Once you've made your choice, click Next to proceed.
Proceed by giving your application a unique Name and Slug. We will start with a Free Trial plan for this guide, but you can always upgrade to a paid plan later. Before moving on, there are some options you need to consider:
- Cloudspace: The region you choose depends on your subscription plan. You can always change this later. Updating the cloud space will require a migration that causes downtime.
- Resources: The free trial does not allow you to modify resources. Paid subscriptions allow you to modify memory, instances, storage, backups, the number of domains, and more.
- Features: Not all features are available to all plans. Compare our plans to see what is available depending on your choice.
Add a Payment method and your Billing information to proceed. Rest assured, we need this information to verify your identity and prevent fraud. You will not be charged during the trial period, ensuring your peace of mind.
Click Create application to finish the setup process.
Our platform will now take a few moments to provision the application. This means our system is making a copy of the files for your application by adding commits to the repository. It's a simple and quick process.
You already have a Blank app and would like to prepare it for deployment on the Divio Cloud Platform. To get your Blank app ready for deployment, you need to create a Dockerfile. This file will contain instructions on how to build your app.
Create a Dockerfile in the root of your application. Here is an example of a Dockerfile for a Blank app:
FROM nginx
For a comprehensive understanding of how the Dockerfile works and its role in preparing your Blank app for deployment, we recommend referring to our detailed documentation.
The Divio CLI uses Docker Compose to run the application locally. Creating a docker-compose.yml file with instructions on how to run your application locally is highly recommended. Here is an example of a docker-compose.yml file for a Blank app:
services:
web:
  build: .
  ports:
    - "8000:80"
  volumes:
    - ".:/app:rw"
    - "./data:/data:rw"
For a comprehensive understanding of how the Docker Compose works and its role in preparing your Blank app for deployment, we recommend referring to our detailed documentation.
Next, head over to the Divio Control Panel and choose to create a new application from the left toolbar.
The application creation wizard will provide you with some options to choose from, and you need to decide between:
- I already have a repository: Connect an existing repository from Github, Gitlab, or Bitbucket to Divio Cloud.
- I have some files uploaded: Provide a link to a ZIP file containing your application files.
Choose the option that fits your needs and follow the instructions. If you have a repository, you will be asked to provide the Git URL to the repository. If you have a ZIP file, you will be asked to provide a link to the ZIP file. Please mind that:
If you choose to use the Divio Git server, you need to connect to the Divio Cloud Platform through the following Git commands from within your local setup once the application creation step has been completed:
git remote add origin git@git.divio.com:myapp.git
git push origin --force
You can skip this step if you choose to connect to an existing repository from Github, Gitlab, or Bitbucket.
Proceed by giving your application a unique Name and Slug. We will start with a Free Trial plan for this guide, but you can always upgrade to a paid plan later. Before moving on, there are some options you need to consider:
- Cloudspace: The region you choose depends on your subscription plan. You can always change this later. Updating the cloud space will require a migration that causes downtime.
- Resources: The free trial does not allow you to modify resources. Paid subscriptions allow you to modify memory, instances, storage, backups, the number of domains, and more.
- Features: Not all features are available to all plans. Compare our plans to see what is available depending on your choice.
Add a Payment method and your Billing information to proceed. Rest assured, we need this information to verify your identity and prevent fraud. You will not be charged during the trial period, ensuring your peace of mind.
Click Create application to finish the setup process.
Our quickstart templates automatically configure all the necessary services for you. This process typically includes Object Storage or a Database:
- If your application requires Object Storage, read How to configure Object Storage.
- If your application requires a Database, read How to configure a Database.
When your application requires these services, it's important to configure them manually as documented above. Once you've completed this step, you can then proceed to deploy your application to Divio Cloud.
We are here to provide you with a comprehensive guide, leading you step-by-step from the very beginning. We'll start with the creation of a new Blank application from scratch, and then we'll show you how to set it up and prepare it for deployment on the Divio Cloud Platform.
Any containerised web application needs a web server to serve the application. In this example, we will use Nginx, a popular web server that can also be used as a reverse proxy, load balancer, and HTTP cache.
To get started, create a new directory for your project and add a Dockerfile with the following content:
FROM nginx

COPY index.html /usr/share/nginx/html/index.html
Create an index.html file in the same directory with some content:
<!DOCTYPE html>
<html lang="en">
<head>
<meta charset="UTF-8">
<meta name="viewport" content="width=device-width, initial-scale=1.0">
<title>Hello World</title>
</head>
<body>
<h1>Hello World!</h1>
</body>
</html>
Next, create a docker-compose.yml file in the same directory with the following content:
services:
web:
  build: .
  ports:
    - "8000:80"
  volumes:
    - ".:/app:rw"
    - "./data:/data:rw"
The docker-compose.yml file defines a service called web that builds the Docker image from the current directory, maps port 8000 on the host to port 80 in the container, and mounts the current directory and a data directory to the container.
Now, run the following command to build and start the Docker container:
docker compose build
docker compose up
Congratulations 🎉 you now have a running Docker container using Nginx.
Next, we want to deploy your Blank application to the Divio Cloud Platform. To continue this, switch to the Migrating an existing app option.
Deploy your Blank app
Your application has two independent server environments, Test and Live. These have their own backups, environment variables, services, and more. They can be deployed independently and configured to track different Git branches. Depending on the subscription plan you choose, you can also add more environments.
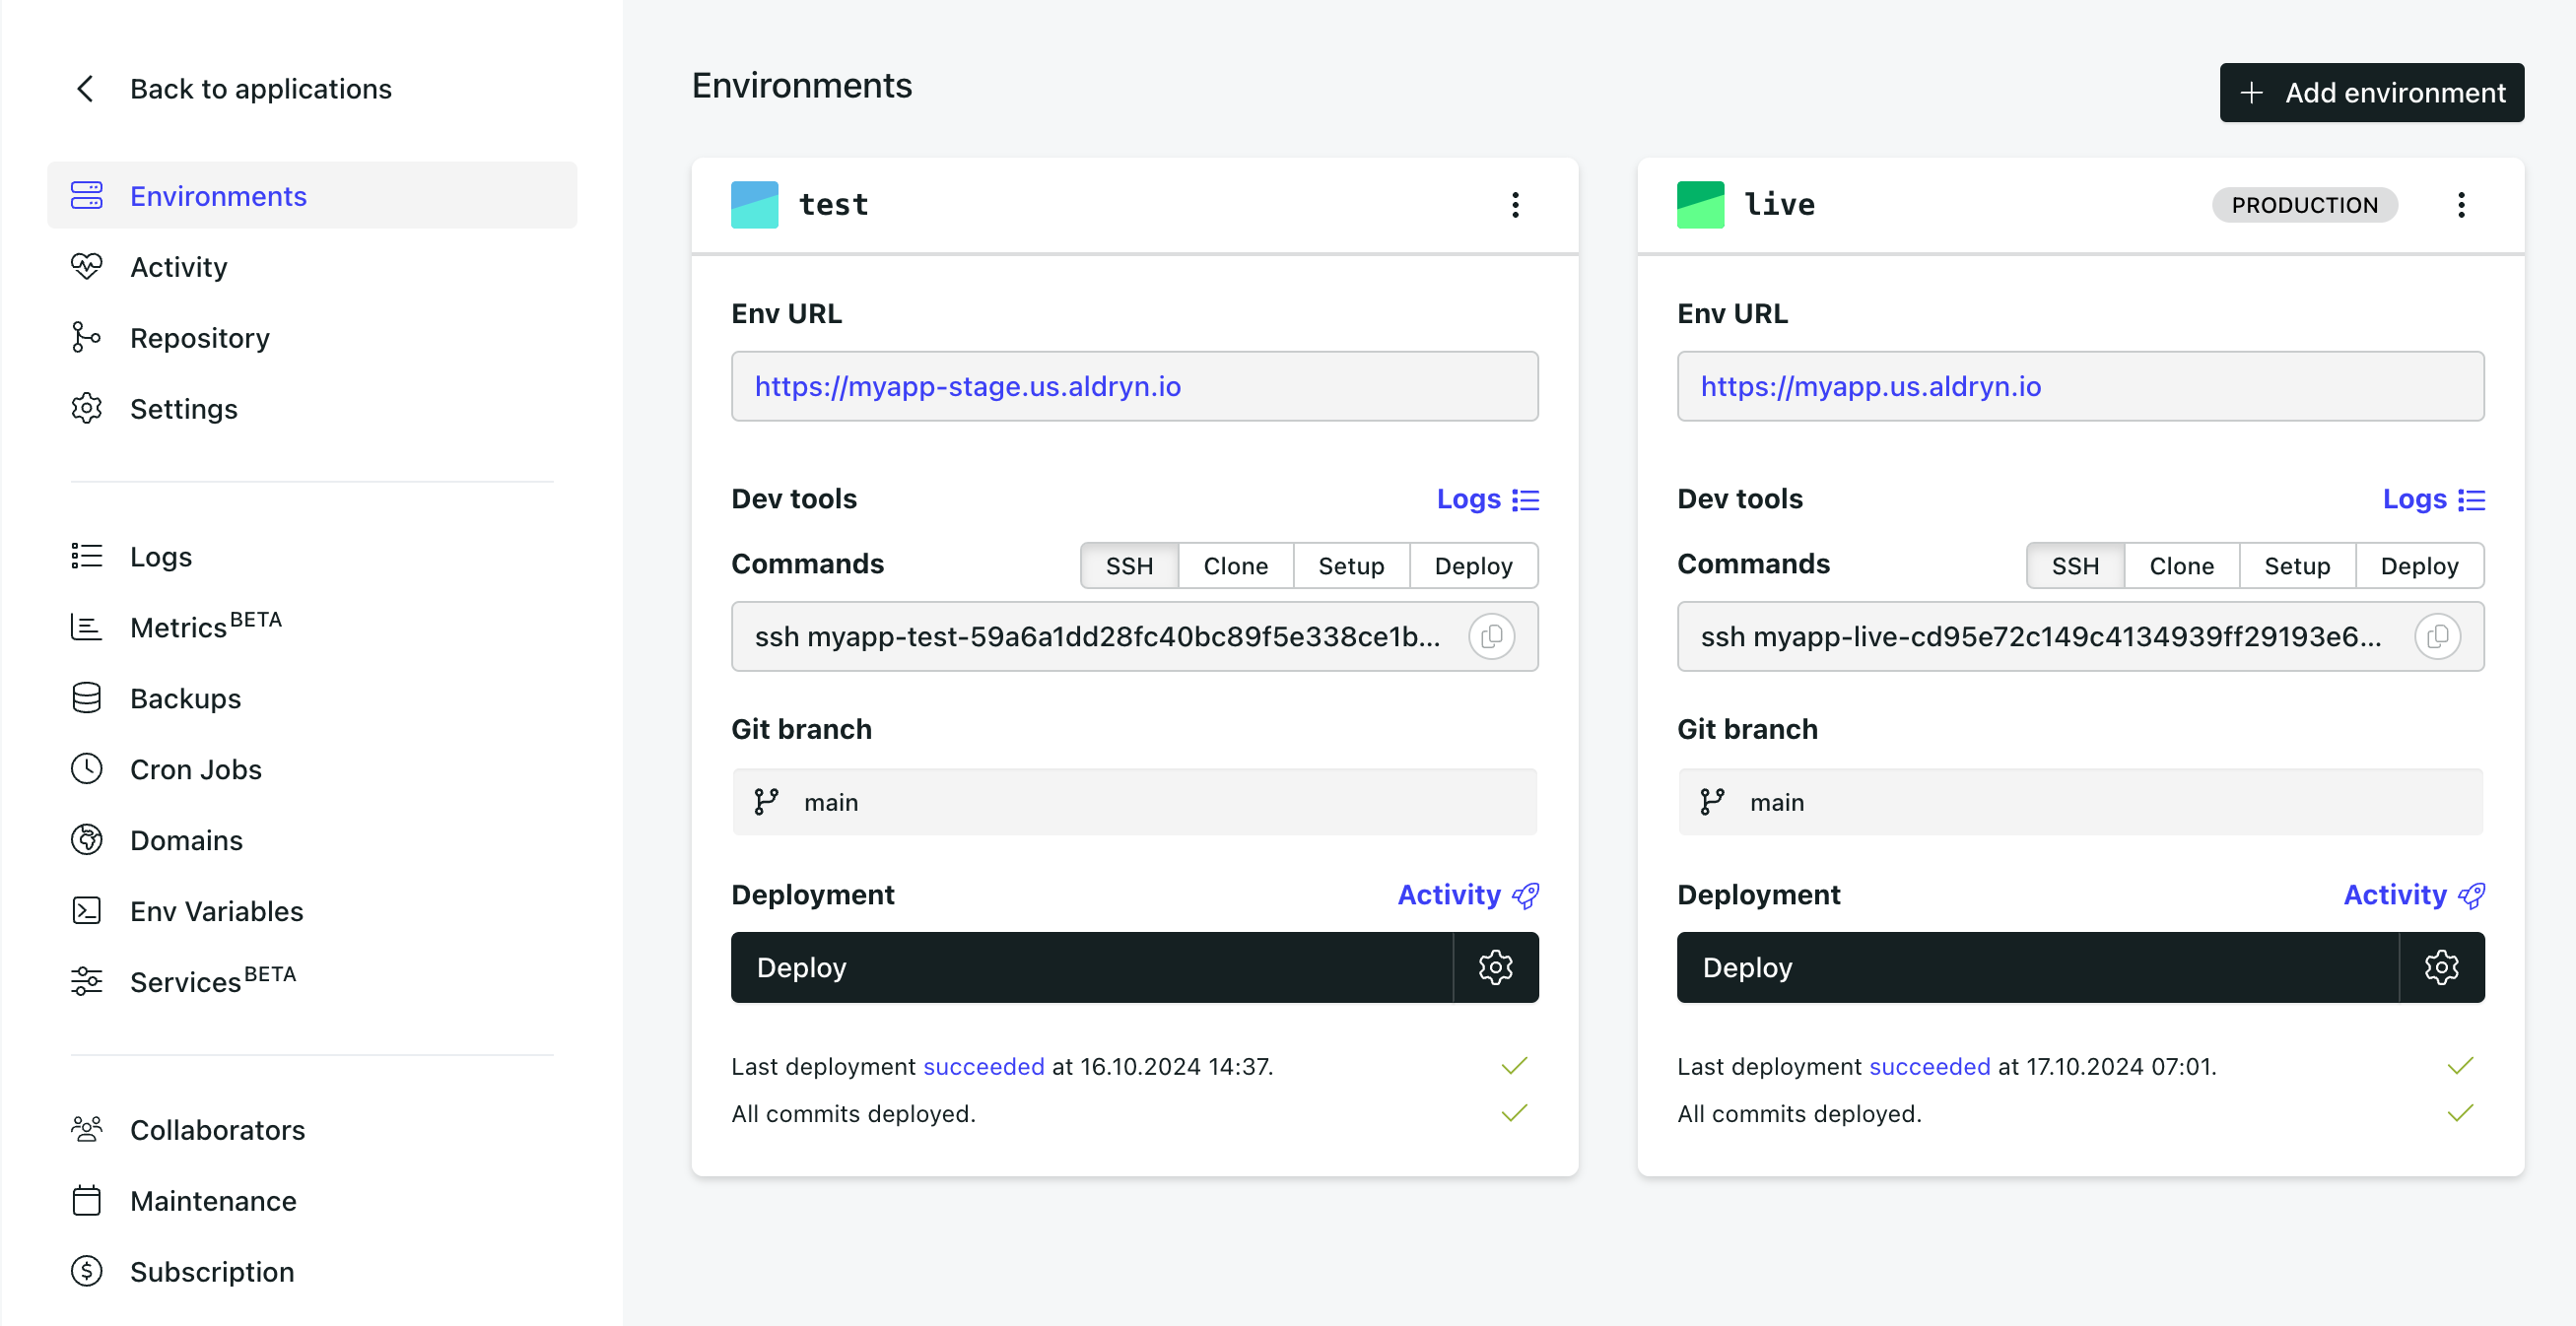
Once your application has been provisioned, press the Deploy button on the Test environment to start the deployment process.
This process builds the Docker image from the Dockerfile, and then launches a Docker container from the image. The container environment will include automatically configured environment variables for connections to services such as a database or media storage.
Typically, this takes a couple of minutes, depending on the complexity of your application.
After you have successfully deployed the Test environment, the Control Panel will indicate this in the interface with a Last deployment succeeded at ... message. The application URL in the test environment pane will display as a link, for example, https://myapp-stage.us.aldryn.io. Click the link to access the application.
The deployment process can fail for various reasons. If you encounter any issues, check the Last deployment failed status message on the environment card or consult the application Logs for further debugging information.
We also provide a debugging checklist that may help you further.
Any time new changes are committed to the repository, the Divio Control Panel will indicate this with a message showing the number of undeployed commits for each server environment.
If a deployment fails for whatever reason, there will be no downtime. The currently running containers will continue running, and the failing changes will not be deployed.

The application dashboard provides you with access to valuable controls and information. They are self-explanatory, and you don't need to interact with any of them at this stage, but it's worth familiarising yourself with what's available.
Setup your Blank app locally
You should have Git and Docker installed and configured on your local machine. We also strongly recommend installing the Divio CLI to interact with the Divio Cloud Platform from the command line. Alternatively, we will provide instructions on how to use Docker Compose to run your application locally instead.
- Using the Divio CLI
- Using Docker Compose
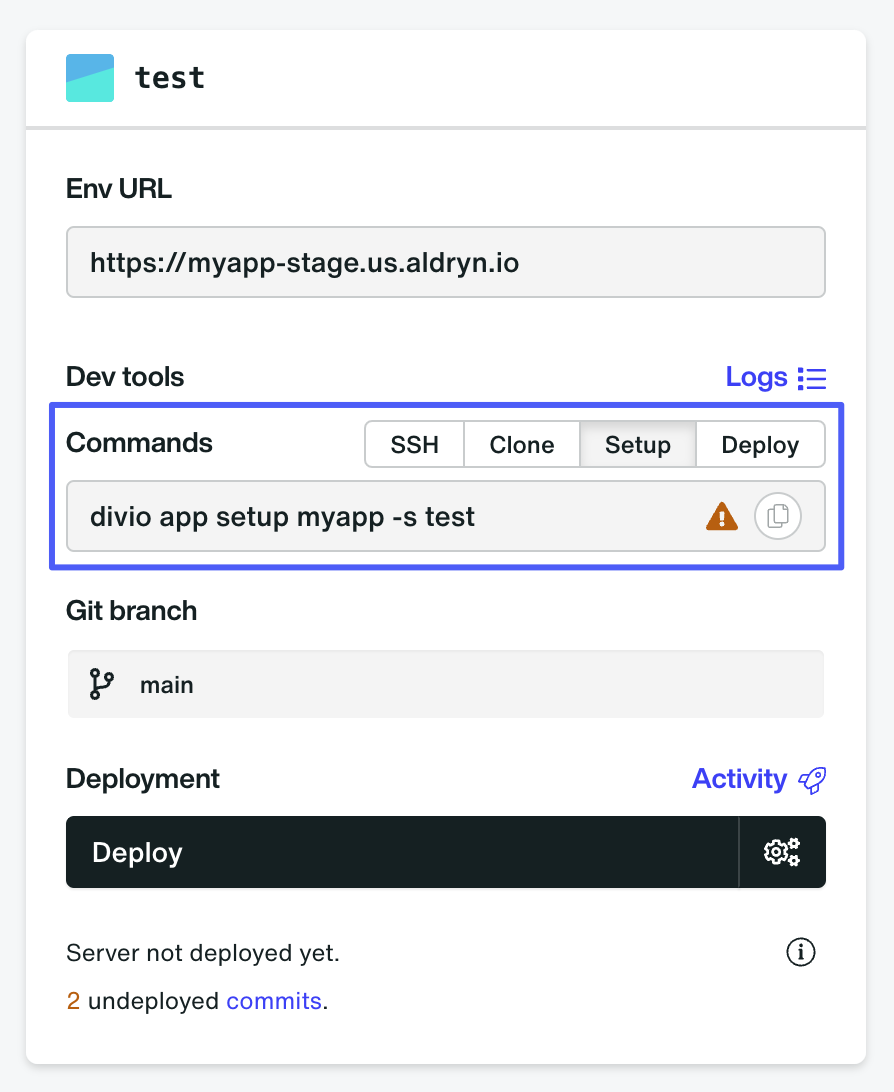
From within your application's dashboard, select the Setup tab and copy the provided command. It should look something like this:
divio app setup myapp -s test
Copy the command into your terminal and run it. The Divio CLI will execute several steps to build your application locally. Depending on how much needs to be downloaded and processed, this may take a few minutes.
In addition to cloning the repository and building the application, the setup command will add a .divio directory containing some Divio-related configuration that connects it to the Divio Control Panel.
Navigate into the newly created application directory to find your application code. For example: cd myapp.
Start the application by running the following command in your terminal:
divio app start
The Divio CLI proxies several commands to the necessary services. Alternatively, you can directly interact with Git, Docker, or Docker Compose to manage your application locally.
To set your application locally, run the command from the Clone tab; it looks something like this:
git clone -b main git@git.divio.com:myapp.git
Navigate into the newly created application directory to find your application code. For example: cd myapp.
Start the application by running the following commands in your terminal:
docker compose build
This ensures the web container is built and ready to run.
Next, start the container:
docker compose up
This command starts the application. The docker-compose.yml file should be in the root of your application and contain the necessary instructions to build and run your application.
The previous step will start the development server defined within your docker-compose.yml file. To view your application, open your web browser and navigate to http://127.0.0.1:8000.
Press CONTROL-C to stop the local development server or run docker compose down.
If you already have a repository or have provided some files and connected to the Divio Cloud Platform through these instructions, you can skip the setup process and start the application locally by running divio app start or docker compose up.
Helpful commands
The Divio CLI offers several commands to interact with your application. These commands, combined with Docker and Docker Compose, provide powerful tools to manage your application. Here are a few of the most useful commands:
- For the Divio CLI
- For Docker
- For Docker Compose
divio app start           # start the application locally
divio app stop            # stop the application locally
divio app logs            # show the logs of the application
divio app open            # open the application in the browser
divio app setup {app}     # setup the application locally
divio app deploy {env}    # deploy the application to an environment
# and many more, see https://github.com/divio/divio-cli for a full list
docker ps       # show running containers
docker info     # show Docker information
# and many more, see https://docs.docker.com/reference/cli/docker/
# for a full list
docker compose build             # build the application
docker compose up                # start the application
docker compose down              # stop the application
docker compose exec web bash     # open a shell in the web container
# and many more, see https://docs.docker.com/compose/reference/
# for a full list
See our local commands cheat sheet for many more useful commands.
Dive Deeper
After setting up and deploying your Blank application on the Divio Cloud Platform, you can explore various features and tools that Divio offers. These tools can help you enhance your application's performance, manage your applications more efficiently, and integrate additional services seamlessly.
Basic features
Advanced features
Once you're comfortable with the basics, you can explore more advanced features and tools to enhance your application even further:
- CI/CD: Implement continuous integration and continuous deployment pipelines. Automate your build, test, and deployment processes to ensure consistent and reliable application updates.
Enable beta features
We frequently introduce new functionalities and improvements. By opting into beta features in your account settings, you can gain early access to these innovations and provide feedback to help shape the future of the platform.
You can enable beta features from within your account settings.